Setting up a car studio booth for automotive photography is a rewarding investment, allowing you to capture stunning, high-quality images of vehicles. Whether you’re a professional photographer, a car dealership, or an enthusiast, creating a dedicated space for car photography can significantly improve your work quality and efficiency. This guide will walk you through the essential steps involved in the installation of a car studio booth, from planning to execution, ensuring you create an ideal environment for capturing beautiful vehicle images.
Before you even begin installing your car studio booth, proper planning is key. Consider the following factors to ensure your booth will meet your needs:
Size and Dimensions
The size of your car studio booth will depend on the types of vehicles you plan to shoot. If you’re focusing on larger vehicles, like SUVs and trucks, you’ll need a larger booth with ample space for both the car and the photographer. A minimum size of 20×30 feet is often recommended, but for tighter spaces or smaller vehicles, a more compact setup may suffice. Make sure there’s enough room to move around the vehicle comfortably while capturing different angles.
Location
Choose a location that allows for easy access to the studio, preferably with sufficient natural light or the ability to control lighting conditions. If the studio will be located indoors, it’s essential to ensure good ventilation, proper ceiling height, and accessible electrical outlets for lighting equipment.
Flooring and Surface
The surface of the booth should be smooth, clean, and durable. Concrete or smooth vinyl floors are ideal, as they provide a sturdy foundation for cars without risk of damage or unsightly marks. Additionally, it’s beneficial to have an easy-to-clean surface to maintain cleanliness during shoots.
Once you’ve planned the space, it’s time to begin the physical setup of your car studio booth. This includes constructing the walls, ceilings, and backdrop.
Walls and Ceilings
To control lighting and reflections, it’s best to use non-reflective surfaces for the walls and ceilings. White or neutral-colored walls are the most popular choices, as they provide a clean backdrop without interfering with the colors of the car. Consider using soundproof materials or insulation if you need to reduce noise levels during the shoot.
Backdrops
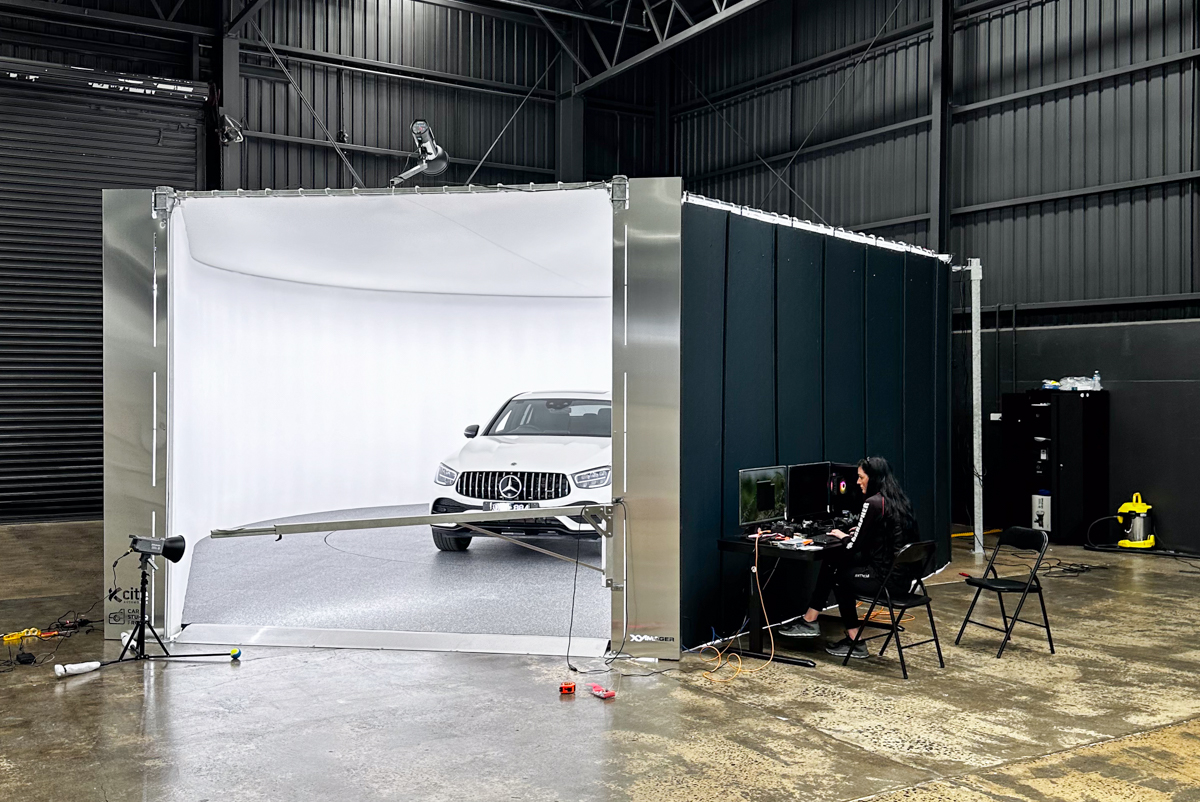
A seamless, clean backdrop is essential for high-quality automotive photography. Many car studios use large, smooth rolls of white or gray paper or fabric to create a neutral background that highlights the vehicle without distractions. You can also opt for a custom backdrop or a set of interchangeable backdrops, allowing for more flexibility in your shots. Make sure the backdrop can be easily replaced or rolled up for storage.
Lighting Setup
Proper lighting is crucial for high-end car photography. Install overhead lighting that provides even coverage and eliminates shadows. A combination of softbox lights, LED panels, and ring lights can help you achieve the perfect lighting balance. Additionally, consider using a light grid to direct the light more precisely. Positioning lights at different angles, such as from the front, sides, and above the vehicle, helps highlight its curves and contours. A well-lit booth will minimize editing time in post-production and ensure high-quality results.
Electricity and lighting are perhaps the most important components of a car studio booth. Ensure you have the following setup:
Lighting Power Sources
Make sure your electrical system can handle the power needs of your lighting equipment. Depending on the size of your lighting setup, you might need dedicated circuits or surge protectors to avoid overloading your electrical system.
Adjustable Lighting
Consider installing adjustable lighting rigs or tracks that allow you to reposition your lights as needed. Flexibility is key when shooting cars of various sizes and colors, so the ability to change the lighting direction or intensity will ensure that you get the best possible results.
Reflectors and Diffusers
Investing in reflectors and diffusers is essential to soften harsh lighting and eliminate unwanted reflections. These tools help balance the lighting in the booth and prevent the car’s glossy surface from appearing too shiny or overexposed.
In addition to the basic structure and lighting setup, you will also need some specialized tools and accessories for a complete car studio booth:
Tripods and Camera Rigs
A sturdy tripod is essential for capturing sharp, detailed images, especially when working with long exposure shots. You may also want to consider a camera rig to help you shoot from unique angles, such as overhead or low ground shots.
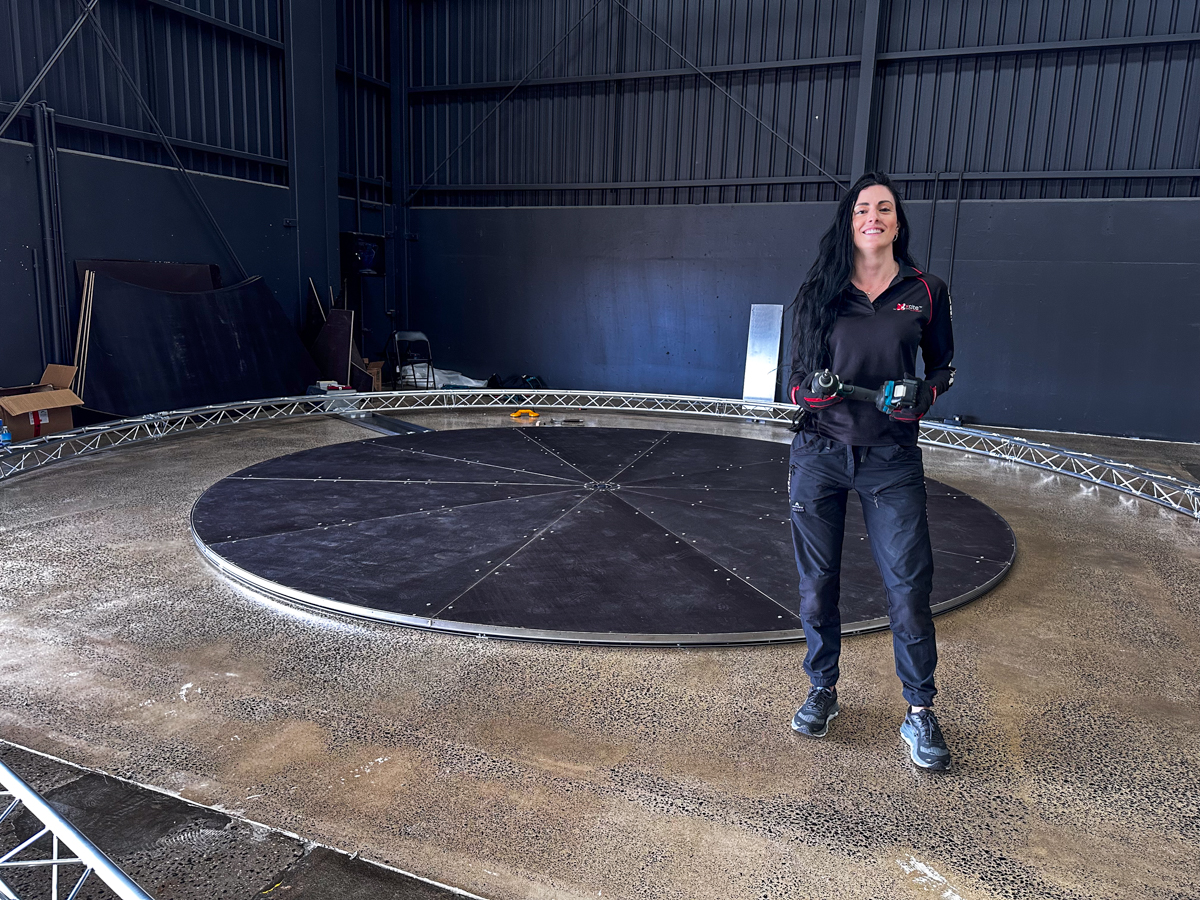
Turntables for Vehicles
To capture dynamic, 360-degree views of vehicles, investing in a vehicle turntable is a great idea. These rotating platforms allow you to photograph the car from all angles without needing to move the vehicle itself, making it easier to create virtual tours or multi-angle shots for online listings.
Storage and Organizational Systems
Having dedicated storage for your photography equipment and accessories can keep the booth organized and efficient. Invest in shelving or cabinets to store props, backdrops, and other tools, ensuring everything is easily accessible during a shoot.
Step 5: Final Touches and Testing
Once the booth is fully constructed and equipped, it’s time to test everything out. Conduct a few test shoots to ensure that the lighting setup, backdrop, and camera angles work together effectively. Adjust the positioning of lights and camera settings as needed, and check for any unwanted shadows or reflections.
Conclusion
Setting up a car studio booth is a highly rewarding process that can drastically enhance the quality of your automotive photography. From choosing the right location and building the structure to optimizing lighting and adding necessary accessories, every step contributes to creating a professional environment that helps you capture breathtaking images. By following this guide, you can ensure that your booth is properly set up for success, delivering high-quality results that will impress clients, enthusiasts, and potential buyers alike.